[] Files Are Gone After Updating Windows 10… How to Recover Them?
Автор
Сообщение
news_bot ®
Стаж: 7 лет 11 месяцев
Сообщений: 27286
Read this article to learn how to recover missing files after updating Windows 10. All possible ways to restore missing documents, photos, music and videos after updating your operating system to the latest version.

The process of adding the latest update and switching from any of the previous versions (for example, Windows 8.1 or Windows 7) to the latest Windows 10 is supposed to be easy, with all your files saved seamlessly just where they belong. However, sometimes the new operating system may behave unpredictably, and your documents, photos, music or videos may disappear after installing the last update.
But even if it happened, there are still grounds for hope, because we have numerous methods to find and restore the missing files.
In this tutorial for Windows 10 we will explore several methods to bring back the missing documents, photos, music and video after upgrading the operating system to the latest version.
How to recover files after a temporary profile is deleted
Right after upgrading to the latest version of Windows 10 you may notice that your files are no longer accessible, but it happens because you signed in using a temporary profile.
You can quickly check if you are really using a temporary profile by taking a few simple steps.
Open the Settings app. This application contains all main elements required to control the operating system and lets you configure it to suit your preferences. There are many ways to open the Settings app.
The quickest and easiest way to open the Settings app is by pressing the key shortcut Windows + I.
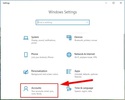
In the main window, select Accounts, as shown in the picture above.
In the left panel, go to Sync your settings.
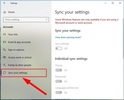
If a message on the right says you are logged in with a temporary profile and some features are not available, restart the computer.
Note: You may have to restart several times until you see your account in the log-in screen.
Sign in to your account.
When you complete these steps, the temporary profile should disappear, and you will be able to access the documents, pictures and videos from your account.
How to restore files with the administrator’s account
If you are upgrading from Windows 7 to Windows 10, and you created a Microsoft account in the process, your files may be assigned to the administrator’s account, which is currently disabled.
In order to bring back your personal files, you need to use the integrated local administrator’s account by following a few simple steps.
Open the Computer Management app.
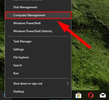
Right-click on the Start button which can be found on the Taskbar to open the context menu. Select Computer Management from the list of available apps.
In the left panel, follow the path:
Computer Management (Local) – System Tools – Local Users and Groups – Users
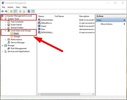
In the middle panel, double-click on the Administrator account, or right-click on it and select Properties.
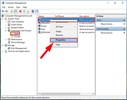
In the window that opens, find the tab General and uncheck the box for Account is disabled.

Then click Apply and ОК for the changes to take effect.
Sign out of your account.
Sign in as the administrator.
When these steps are complete, you will see your files again while you are signed in with the local administrator account. All you have to do now is to back them up and restore all your files to the freshly created Microsoft account.
How to restore files with the search feature
You can also find the missing files with the help of the search feature in Windows 10, and there a only a few steps to take:
Open This PC by double-clicking on the desktop shortcut, or by pressing the buttons Windows + E.
In the left panel, select the directory to search for files, This PC.
Find the search field in the top right corner, type your query and locate your files.

If you are looking for files of a certain type, you can use the asterisk sign (*) as the wildcard character. For example, you can use the query *.docx to display all your Microsoft Word documents.
In addition, you can use other functionality of the Search tab to specify some settings for the files you are looking for. For example, you can click on the drop-down menu Other properties and enable some extra search criteria. What is more, you can use the Kinddrop-down menu to quickly search for files, including documents, images, videos, music etc.

Sometimes, when your operating system gets upgraded to the latest version of Windows 10, your personal files may migrate to another folder. If you can find your files with the search function, right-click on one of the files and select File location from the context menu. The File Explorer will open the directory where they are stored. Select your files and move them to the folder where you want them to be.

Show hidden files
Depending on how your system settings are configured, some files may not be displayed in the File Explorer. By default, you cannot see some types of hidden files. In Windows 10 you can make such hidden files visible by taking a few simple steps:
Open This PC (for example, by pressing together the buttons Windows + E).
In the File Explorer window, go to the tab View.
In the section Show\hide open the nested menu and check the box for Hidden items to have hidden files displayed.
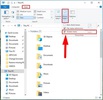
Then try using the search function again to find the files you need.
How to recover files using the folder Windows.old
If you’ve installed Windows 10 as a result of the upgrade process or installed it manually without removing the main partition, the operating system will save a copy of your previous operating system in the folder Windows.old, which you can use to restore the missing files.
How to recover files using the folder Windows.old, this is what you should do:
Open the File Explorer in any way you like, for example, by double-clicking This PC on the desktop.
In the left panel, select This PC.
In the right panel, find the icon of the system drive С: and double-click on it to open.
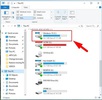
On the list of system drive folders, find and open Windows.old.

Inside, there are all kinds of saved files. Find the files you need (personal files will be saved to the folder Users) and move them elsewhere.
If you don’t see the folder Windows.old, you may have upgraded the operating system with clean installation, which removes all data from the system drive. Also, something may have happened during the installation and a copy of the previous OS has not been saved. One more possible reason is that the ten days’ period after upgrading to the latest version of Windows 10 is over, and in that case, the operating system removes this folder automatically.
How to recover files from a backup
If none of the methods described above works, and you failed to bring back the missing files, you will have to use a previously created backup to restore them. However, bear in mind that the stages of the recovery process may differ depending on the backup method you have used.
Below, you will find instructions on file recovery when using integrated system tools and OneDrive feature. (If you used a different tool to create your backup, visit the developer’s website for support and expert advice).
Use a system image backup
If you used the backup tool Create a system image integrated with Windows 10, you won’t be able to restore individual files, but you can connect a disk to backup files and then use this workaround for file recovery:
Open the Computer Management app in any way we have previously described in this tutorial (for example, open This PC and click on the link Manage in the tab Computer).
In the left panel, follow the path:
Computer Management (Local) – Storage – Disk Management.
This application will help you manage all disks and partitions on your computer, both internal and external, as long as they are connected at the moment.
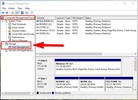
Or right-click on the Start button that you can find in the lower left corner on the Taskbar, and select Disk Management from the pop-up menu.

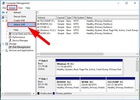
In the main menu above, select the tab Action and open the nested menu. From the list of possible actions, select Attach VHD.
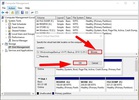
In the action window, click Browse to find the file you need.
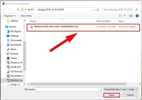
In the window Browse Virtual Disk Files give the path to the saved backup. The default location for the backup folder is: WindowsImageBackup \ <COMPUTER-NAME> \ Backup xxxx-xx-xx xxxxxx \.
Select the largest file with the extension .vhdx and click Open.
Click ОК.
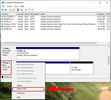
Now right-click on the partition that appears, and choose the line Change drive letter or path… in the context menu that appears.
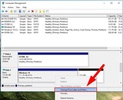
In the new window, click Add and select a new drive letter (as a rule, you will be suggested to use the nearest letter which is not in use).
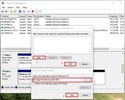
Click ОК to finish.
When it’s over, open File Explorer and find the disk by the letter you have assigned to it. Now you can copy all the files you need from the disk to your computer.
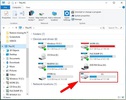
When files are copied, go back to the Disk Management window, right-click on the virtual disk, and select the option Detach VHD to remove the disk properly. Now it won’t be shown in the File Explorer window.
Use the backup feature in Windows 10
If you use the backup feature in Windows 10 you can quickly restore one or several files, taking the following steps:
Open the Control Panel app which contains all elements to manage the computer.
Click on the Search icon located next to the Start button and type in your query, Control Panel. Select the best match option and open the app.

In the window All Control Panel Items select Backup and Restore (Windows 7).
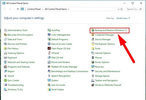
Drag the scroll bar down to find the section Restore and click the button Restore my files.
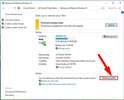
In the window that opens, click Browse for files.
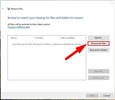
View the backup and select the files you want to restore. Then click Add files.
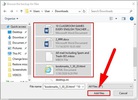
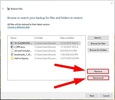
Then, in the window Restore Files click Browse for folders. Review the backup again and select the folders you want to restore, then click Add folders. When files and folders for restoring are selected, click Next.
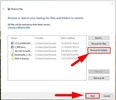
You can change the number of files and folders selected for recovery from the backup, and you can remove some selected elements from the list of files for recovery, or even delete all of them by clearing the list and select new files by using the corresponding buttons Remove and Remove all.
Select the default setting In the original location. Otherwise, if you want to restore files to a different folder, select In the following location.
Click Browse… and give the new directory where to save your data.
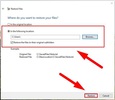
Click Restore to start the process of recovering the selected data.
When the process is over, click Finish.

Now all your restored files and folders will be available in the directory you have specified.
Use File History
As an alternative, if you failed to restore missing personal files after an update using the hints we have given in this article, you can still get your files with the help of File History.
Open the Settings app in any way you prefer, for example, by pressing the key shortcut “Windows + I.”
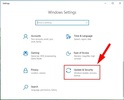
In the application window, select the section Update and security.
In the left panel, click Backup. Go to the right panel and click on the link More options.
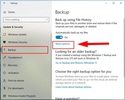
Use the scroll bar to go to the bottom of the page and click on the link Restore files from a current backup.
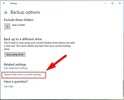
In the window Home – File History that opens, select the files you want to restore.
Then click Restore to original location.

After you have completed the steps we have described, your missing files will be available on your device again.
Use OneDrive
OneDrive is a cloud data storage which is located not on your computer or an external disk but on the Internet, and you can use it to back up your files. If you are using Dropbox, Google Drive or another similar storage service, make sure to visit their support website to find expert advice on how to use them properly.
Why it is important to have a backup
The the process of upgrading your operating system to the latest version of Windows 10 is supposed to keep all your files intact, it should be admitted that there is always a chance of an emergency. That is why it is very important to back up your data regularly (or at least do it before upgrading your OS).
Besides, having a backup is good not only for recovering your files after an upgrade – it can help just as well when you need to recover the operating system after a hard disk failure, an unexpected system error or after a malware attack on your PC.
In today’s article, we showed you various methods to find and recover missing user files. Now that you are informed, you can always find your files if necessary.
See the full article with all additional video tutorials. If you still have any questions, please ask in a comments.
===========
Источник:
habr.com
===========
Похожие новости:
- [Data Mining, Data Engineering] How to Recover Data From a Hikvision DVR
- [Data Mining, Data Engineering] Data Recovery from LVM Volumes in Linux
- [Data Mining, Microsoft Edge] How to Make Your Windows 10 Laptop Work Better
- [Data Mining, Data Engineering] How to Recover RAID 5 Data from SAN D-Link DSN-1100
- [Data Mining, Data Engineering] How to Create a RAID 5 System With LVM Tool and Recover Data After Failures
- [Информационная безопасность, Системное администрирование, IT-компании] Microsoft подтвердила проблемы с мартовскими обновлениями для различных версий Windows 10
- [Работа с 3D-графикой, Разработка под Windows, Софт] Из Windows 10 удалят Paint 3D и 3D Viewer
- Сгорел датацентр европейского хостера OVHCloud в Страсбурге
- [IT-инфраструктура] Обновление и продление поддержки Windows на банкоматах, платежных киосках и кассах
- [Восстановление данных, Компьютерное железо, Старое железо] Necronomicon notitia recuperatio: обряды и верования восстановления данных с дискет 3.5 дюйма
Теги для поиска: #_data_recovery, #_files, #_backup, #_windows_10, #_windows_update., #_blog_kompanii_hetman_software (
Блог компании Hetman Software
)
Вы не можете начинать темы
Вы не можете отвечать на сообщения
Вы не можете редактировать свои сообщения
Вы не можете удалять свои сообщения
Вы не можете голосовать в опросах
Вы не можете прикреплять файлы к сообщениям
Вы не можете скачивать файлы
Текущее время: 15-Янв 09:17
Часовой пояс: UTC + 5
| Автор | Сообщение |
|---|---|
|
news_bot ®
Стаж: 7 лет 11 месяцев |
|
|
Read this article to learn how to recover missing files after updating Windows 10. All possible ways to restore missing documents, photos, music and videos after updating your operating system to the latest version.  The process of adding the latest update and switching from any of the previous versions (for example, Windows 8.1 or Windows 7) to the latest Windows 10 is supposed to be easy, with all your files saved seamlessly just where they belong. However, sometimes the new operating system may behave unpredictably, and your documents, photos, music or videos may disappear after installing the last update. But even if it happened, there are still grounds for hope, because we have numerous methods to find and restore the missing files. In this tutorial for Windows 10 we will explore several methods to bring back the missing documents, photos, music and video after upgrading the operating system to the latest version. How to recover files after a temporary profile is deleted Right after upgrading to the latest version of Windows 10 you may notice that your files are no longer accessible, but it happens because you signed in using a temporary profile. You can quickly check if you are really using a temporary profile by taking a few simple steps. Open the Settings app. This application contains all main elements required to control the operating system and lets you configure it to suit your preferences. There are many ways to open the Settings app. The quickest and easiest way to open the Settings app is by pressing the key shortcut Windows + I.  In the main window, select Accounts, as shown in the picture above. In the left panel, go to Sync your settings.  If a message on the right says you are logged in with a temporary profile and some features are not available, restart the computer. Note: You may have to restart several times until you see your account in the log-in screen. Sign in to your account. When you complete these steps, the temporary profile should disappear, and you will be able to access the documents, pictures and videos from your account. How to restore files with the administrator’s account If you are upgrading from Windows 7 to Windows 10, and you created a Microsoft account in the process, your files may be assigned to the administrator’s account, which is currently disabled. In order to bring back your personal files, you need to use the integrated local administrator’s account by following a few simple steps. Open the Computer Management app. Right-click on the Start button which can be found on the Taskbar to open the context menu. Select Computer Management from the list of available apps.  In the left panel, follow the path: Computer Management (Local) – System Tools – Local Users and Groups – Users  In the middle panel, double-click on the Administrator account, or right-click on it and select Properties.  In the window that opens, find the tab General and uncheck the box for Account is disabled.  Then click Apply and ОК for the changes to take effect. Sign out of your account. Sign in as the administrator. When these steps are complete, you will see your files again while you are signed in with the local administrator account. All you have to do now is to back them up and restore all your files to the freshly created Microsoft account. How to restore files with the search feature You can also find the missing files with the help of the search feature in Windows 10, and there a only a few steps to take: Open This PC by double-clicking on the desktop shortcut, or by pressing the buttons Windows + E. In the left panel, select the directory to search for files, This PC. Find the search field in the top right corner, type your query and locate your files.  If you are looking for files of a certain type, you can use the asterisk sign (*) as the wildcard character. For example, you can use the query *.docx to display all your Microsoft Word documents. In addition, you can use other functionality of the Search tab to specify some settings for the files you are looking for. For example, you can click on the drop-down menu Other properties and enable some extra search criteria. What is more, you can use the Kinddrop-down menu to quickly search for files, including documents, images, videos, music etc.  Sometimes, when your operating system gets upgraded to the latest version of Windows 10, your personal files may migrate to another folder. If you can find your files with the search function, right-click on one of the files and select File location from the context menu. The File Explorer will open the directory where they are stored. Select your files and move them to the folder where you want them to be.  Show hidden files Depending on how your system settings are configured, some files may not be displayed in the File Explorer. By default, you cannot see some types of hidden files. In Windows 10 you can make such hidden files visible by taking a few simple steps: Open This PC (for example, by pressing together the buttons Windows + E). In the File Explorer window, go to the tab View. In the section Show\hide open the nested menu and check the box for Hidden items to have hidden files displayed.  Then try using the search function again to find the files you need. How to recover files using the folder Windows.old If you’ve installed Windows 10 as a result of the upgrade process or installed it manually without removing the main partition, the operating system will save a copy of your previous operating system in the folder Windows.old, which you can use to restore the missing files. How to recover files using the folder Windows.old, this is what you should do: Open the File Explorer in any way you like, for example, by double-clicking This PC on the desktop. In the left panel, select This PC. In the right panel, find the icon of the system drive С: and double-click on it to open.  On the list of system drive folders, find and open Windows.old.  Inside, there are all kinds of saved files. Find the files you need (personal files will be saved to the folder Users) and move them elsewhere. If you don’t see the folder Windows.old, you may have upgraded the operating system with clean installation, which removes all data from the system drive. Also, something may have happened during the installation and a copy of the previous OS has not been saved. One more possible reason is that the ten days’ period after upgrading to the latest version of Windows 10 is over, and in that case, the operating system removes this folder automatically. How to recover files from a backup If none of the methods described above works, and you failed to bring back the missing files, you will have to use a previously created backup to restore them. However, bear in mind that the stages of the recovery process may differ depending on the backup method you have used. Below, you will find instructions on file recovery when using integrated system tools and OneDrive feature. (If you used a different tool to create your backup, visit the developer’s website for support and expert advice). Use a system image backup If you used the backup tool Create a system image integrated with Windows 10, you won’t be able to restore individual files, but you can connect a disk to backup files and then use this workaround for file recovery: Open the Computer Management app in any way we have previously described in this tutorial (for example, open This PC and click on the link Manage in the tab Computer). In the left panel, follow the path: Computer Management (Local) – Storage – Disk Management. This application will help you manage all disks and partitions on your computer, both internal and external, as long as they are connected at the moment.  Or right-click on the Start button that you can find in the lower left corner on the Taskbar, and select Disk Management from the pop-up menu.  In the main menu above, select the tab Action and open the nested menu. From the list of possible actions, select Attach VHD.  In the action window, click Browse to find the file you need.  In the window Browse Virtual Disk Files give the path to the saved backup. The default location for the backup folder is: WindowsImageBackup \ <COMPUTER-NAME> \ Backup xxxx-xx-xx xxxxxx \. Select the largest file with the extension .vhdx and click Open.  Click ОК. Now right-click on the partition that appears, and choose the line Change drive letter or path… in the context menu that appears.  In the new window, click Add and select a new drive letter (as a rule, you will be suggested to use the nearest letter which is not in use).  Click ОК to finish. When it’s over, open File Explorer and find the disk by the letter you have assigned to it. Now you can copy all the files you need from the disk to your computer.  When files are copied, go back to the Disk Management window, right-click on the virtual disk, and select the option Detach VHD to remove the disk properly. Now it won’t be shown in the File Explorer window.  Use the backup feature in Windows 10 If you use the backup feature in Windows 10 you can quickly restore one or several files, taking the following steps: Open the Control Panel app which contains all elements to manage the computer. Click on the Search icon located next to the Start button and type in your query, Control Panel. Select the best match option and open the app.  In the window All Control Panel Items select Backup and Restore (Windows 7).  Drag the scroll bar down to find the section Restore and click the button Restore my files.  In the window that opens, click Browse for files.  View the backup and select the files you want to restore. Then click Add files.  Then, in the window Restore Files click Browse for folders. Review the backup again and select the folders you want to restore, then click Add folders. When files and folders for restoring are selected, click Next.  You can change the number of files and folders selected for recovery from the backup, and you can remove some selected elements from the list of files for recovery, or even delete all of them by clearing the list and select new files by using the corresponding buttons Remove and Remove all.  Select the default setting In the original location. Otherwise, if you want to restore files to a different folder, select In the following location. Click Browse… and give the new directory where to save your data.  Click Restore to start the process of recovering the selected data. When the process is over, click Finish.  Now all your restored files and folders will be available in the directory you have specified. Use File History As an alternative, if you failed to restore missing personal files after an update using the hints we have given in this article, you can still get your files with the help of File History. Open the Settings app in any way you prefer, for example, by pressing the key shortcut “Windows + I.” In the application window, select the section Update and security.  In the left panel, click Backup. Go to the right panel and click on the link More options.  Use the scroll bar to go to the bottom of the page and click on the link Restore files from a current backup.  In the window Home – File History that opens, select the files you want to restore. Then click Restore to original location.  After you have completed the steps we have described, your missing files will be available on your device again. Use OneDrive OneDrive is a cloud data storage which is located not on your computer or an external disk but on the Internet, and you can use it to back up your files. If you are using Dropbox, Google Drive or another similar storage service, make sure to visit their support website to find expert advice on how to use them properly. Why it is important to have a backup The the process of upgrading your operating system to the latest version of Windows 10 is supposed to keep all your files intact, it should be admitted that there is always a chance of an emergency. That is why it is very important to back up your data regularly (or at least do it before upgrading your OS). Besides, having a backup is good not only for recovering your files after an upgrade – it can help just as well when you need to recover the operating system after a hard disk failure, an unexpected system error or after a malware attack on your PC. In today’s article, we showed you various methods to find and recover missing user files. Now that you are informed, you can always find your files if necessary. See the full article with all additional video tutorials. If you still have any questions, please ask in a comments. =========== Источник: habr.com =========== Похожие новости:
Блог компании Hetman Software ) |
|
Вы не можете начинать темы
Вы не можете отвечать на сообщения
Вы не можете редактировать свои сообщения
Вы не можете удалять свои сообщения
Вы не можете голосовать в опросах
Вы не можете прикреплять файлы к сообщениям
Вы не можете скачивать файлы
Вы не можете отвечать на сообщения
Вы не можете редактировать свои сообщения
Вы не можете удалять свои сообщения
Вы не можете голосовать в опросах
Вы не можете прикреплять файлы к сообщениям
Вы не можете скачивать файлы
Текущее время: 15-Янв 09:17
Часовой пояс: UTC + 5
