[Data Mining, Microsoft Edge] How to Make Your Windows 10 Laptop Work Better
Автор
Сообщение
news_bot ®
Стаж: 7 лет 11 месяцев
Сообщений: 27286
Read this article to find out how to get your laptop ready for all kinds of tasks without paying extra. And how to configure Windows 10 in the best way. We will explore how to maintain Windows 10, configure system security and laptop power settings, what software to install and how to connect peripherals. Here is the best all-round guide for you!

Introduction
In this guide, we will tell you about twelve easy methods to improve overall performance of your Windows 10 laptops, including steps for clearing junk files, optimizing the operating system and battery charge consumption, configuring security settings and installing additional apps.
How to free up disk space with the help of Storage settings in Windows 10
In Windows 10, there is a section entitled Storage that manages the local hard disk of your laptop and contains various storage settings. Use it for an easy way to remove unnecessary files from the system disk as well as other internal and external storage devices. Using the functionality of this section, you can quickly get rid of outdated setup and temporary files in order to free disk space fro more important data and improve disk efficiency.
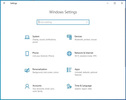
In Windows 10, all main settings for the operating system, installed applications and services are concentrated into the unified and multifunctional application, Settings. There are several ways to access it.
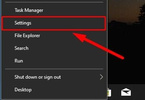
Right-click on the Start button or press the keyboard shortcut Windows + X to open the context menu and select Settings.
Remove temporary files manually
To delete temporary files from your Windows 10 laptop, just do the following.
Open the Settings app in any way you prefer.
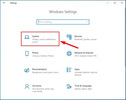
In the main page, click on the System tab.
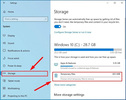
In the left side of the Windows 10 settings panel, select Storage.
Now look to the right, find the section Storage sense and click on the link Free up space now (for Windows 10 with the official October 2018 Update or an earlier version).

For Windows 10 version 1903look to the right to find the section Windows 10 (C:) and click on Temporary files.
In the new page, the operating system will scan the available disk space, find and identify temporary files, arrange them by their properties and prepare them for being removed.
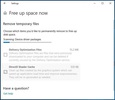
When the operations are accomplished, you will see the entire list of all discovered items. Check the files suggested for removal with the help of the description that includes the following lines:
- Windows upgrade log files.
- Thumbnails.
- Temporary files.
- Delivery optimization files.
- Windows error reports generated by the operating system. Recycle Bin.
- Temporary Internet files.
- Windows Defender Antivirus.
- DirectX shader cache.
Hint: Elements available for removal may differ depending on the version of the operating system and applications installed on a specific computer. Also, you may have noticed that we do not mention the Downloads folder. If you plan to select it, make sure it doesn’t contain any mission-critical files before clearing its contents.
Select items for removal by checking the corresponding boxes and click Remove files.
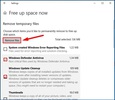
The operating system will clear the selected elements immediately and free up disk space for storing more important user data.
Remove temporary files automatically
To configure automatic cleaning disk space from files you don’t need any longer, do the following in the Storage section.
Open the Settings app in any way you like.
In the main page, click on the System tab again.
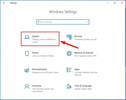
Select Storage on the left.
In the right panel, find the section Storage sense and drag the slider into On position to enable automatic disk space cleaning for the hard disk in your laptop.
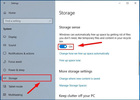
After that, click Change how we free up space automatically below, or jump to the page where cleaning settings can be changed (just as before, we are describing the sequence of actions for Windows 10 with the October 2018 update or an earlier version).

For version 1903, go to the same Storage section and drag the slider for storage sense to the On position, and then use the link Configure Storage Sense or run it now to access a similar settings page.
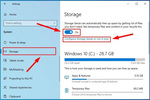
In the section Storage Sense, use the dropdown menu Run Storage Sense and select one of the predefined time intervals for automatic start:
- Every day.
- Every week.
- Every month.
- During low free disk space.
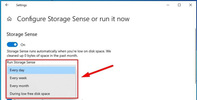
In the next section Temporary files check the box for Delete temporary files that my apps aren’t using.

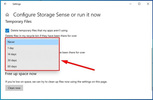
After that, set the time range for removal of deleted files from the Recycle Bin of your operating system. Use the dropdown menu Delete files in my recycle bin if they have been there for over and select the time interval, after which the bin is going to be emptied automatically.
After that, set the time interval in the dropdown menu Delete files in my Downloads folder if they have been there for over, to decide how long files downloaded from the Internet should be stored before they are removed automatically.
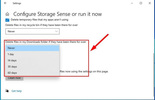
Advice: If you want to remove as may files as possible, choose the option 1 day. Bear in mind, though, that the Downloads folder may contain personal or important files, so it is recommended to back up all the files you need for the future before you proceed with automatic cleaning.
Now, find the section Locally available cloud content, open the dropdown menu Content will become online-only if not opened for more than and select the maximal number of days after which the files that have not been used for a long time will be removed from the hard disk of your laptop – on condition, though, that their synchronized backup copy is saved to the cloud storage, OneDrive.
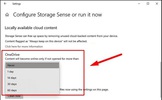
In the section Free up space now, check the box for Delete previous versions of Windows (if such line is displayed). With this option available, you may gain from 10 to 20 GB of additional free space.
Summing up, in the section Free up space now click on the button Clean now to start the process of removing the files according to the settings you have chosen in this page.

When all these actions are performed, some extra free space will appear in the hard disk of your laptop, or (depending on the settings) the automatic cleaning will run to optimize the storage device.
How to remove unnecessary apps in Windows 10
In order to remove unnecessary applications and games from Windows 10, here are the steps to take:
Open the Settings app in any way we have shown before.
In the main page, select the tab Apps.
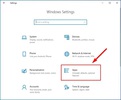
In the left panel, look for Apps & features.
Click on it, and on the right, you will see all integrated and user-installed apps currently available for this computer. Scroll down or drag the slider down to navigate the list and find the application you’d like to remove in order to gain more free space.
Advice: Click on the arrow Sort by to display the dropdown menu and choose the option Size, to see the applications that take up most space on the storage of your device.
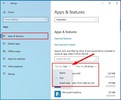
Left-click on the selected application and then choose Uninstall.
The operating system will ask you to confirm your choice. Click the Uninstall button again in the system notification This app and its related info will be uninstalled.
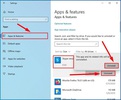
The selected application will be removed and the disk space required for its installation and system files will be cleaned. Repeat the steps for other applications and games until the hard disk of your laptop is free from the programs you don’t need any longer.
How to update your Windows 10 to the latest version available
Keeping Windows 10 up to date lets users access the latest system features and improvements introduced and tested by Microsoft. Besides, updating Windows 10regularly is the best way to make sure that your computer has the latest security updates capable of defending your files and programs from all kinds of network threats.
Update Windows 10 to the latest version with Windows Update service
In order to update Windows 10 to the latest version with Windows Update service, follow these steps.
Open the Settings app in any way you prefer.
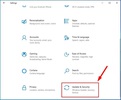
Scroll down to reach the bottom of the list and select Update & Security.
In the left-side panel, click on Windows Update.
If the operating system doesn’t show you an invitation to update it to the latest version automatically, click on the button Check for updates to find out if your machine is ready for the official update package.

When the check is complete, click on the link Download and install now, that you can find in the section Feature update to Windows 10…. (The package containing new features and security improvements will only be available if your computing device is fully compatible with the suggested updates).
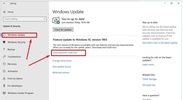
Then hit the button Restart now, to have the operating system prepare your laptop for installing system packages of the latest Windows 10 version.
Update Windows 10 to the latest version with Update Assistant
If your laptop doesn’t shown any suggestions to update its operating system to the latest version, but you are confident that your device is absolutely compatible with it and ready for installation, you can have it done with Update Assistant.
In order to install the new version of Windows 10 with the help of Update Assistant, just do the following.
Open any web browser and visit the Microsoft official website offering support for all of their products.
In the section Windows … Update now available click on Update now.
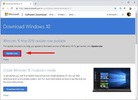
When the download is over, double-click on the executable file Windows10Upgrade to start the system update tool. When the User Account Control system asks you Allow this application to make changes to your device? click Yes, and the Update Assistant will start.
In the Update Assistant window, click Update now.
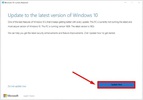
When the computer is checked for compatibility and installation of updates is possible, click Next.
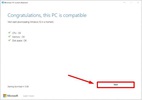
The Update Assistant will start downloading the latest Windows 10 updates and get them ready.
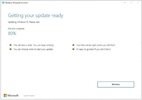
When the process is over, click on Restart now.
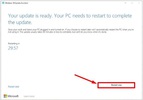
When you complete all these steps, the Update Assistant for Windows 10 will update your laptop to the latest version while saving user files, and leaving applications and most settings unchanged.
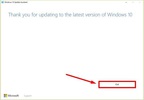
Click Exit when everything is done, and you will see your laptop now having the latest version of the operating system.
How to shorten the list of apps that start with Windows 10
Many applications that people install on their laptops may change permissions and include themselves into the startup list so they can boot together with the operating system. Sometimes, they even configure additional background services to run at startup as well. Despite the fact that having third-party apps start with the operating system is sometimes an advantage, several such processes starting at the same time may have a serious impact on how quickly the laptop boots, reduce the time it can work on battery and affect overall system performance.
That is why if your Windows 10 starts with a bunch of other apps which you don’t need right when your computer is ready for work, you can disable them, and here is how.
Open the Settings app using one of the methods we showed before.
In the main page, select the tab Apps.
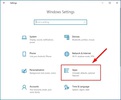
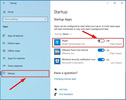
In the left panel, jump to Startup.
When you look to the right, you will see the panel where you can decide which apps should start with the operating system. In the lines of corresponding applications which can affect system performance at startup, set the slider to the Off position, and the next time you boot your computer, these apps won’t start in the background.
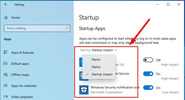
Advice: Open the dropdown menu Sort by with clicking on the downward arrow, and select the option Startup impact to arrange applications in a descending order by how they affect system performance when booting with Windows. Despite their attempts to reduce the number of such applications to a minimum, most users tend to never disable startup for Microsoft services like OneDrive and Windows Security Notification.
When certain applications are removed from the startup list, the operating system of your laptop should boot much faster.
How to back up the system drive of your Windows 10 laptop
Complete data backup for all information stored on your laptop is probably one of the best ways to secure user data against unexpected loss due to hardware failures, system errors, software compatibility issues, malware activities or theft attempts.
With all those advanced third-party tools for data backup, there is nothing to prevent you from using the good old utility to create a system image directly inside your Windows 10.
Important information: At the moment, users can still use system tools to create a system image. but it may be disabled in the future. With further official updates for Windows 10, Microsoft may decide to remove them from the list of integrated services.
As the tool for creating a system image was introduced back in earlier versions of Windows, it can be accessed directly from the Control Panel application. Initially, this app contains all main settings of the operating system, but beginning with Windows 8.1 developers started moving them to the new application, Settings, in order to display settings within a more advanced platform. Meanwhile, Control Panel only duplicates functions of the new app and contains specific tools, including Backup and Restore.
To create a complete backup of the data you store on your laptop, there is a sequence of steps to take.
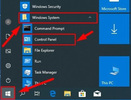
Open the Control Panel app in any way you know. For example, click on the Start button which you can find in the lower left corner of the Taskbar to open the main Windows menu. Scroll down the list of available apps and services, find the section Windows System and left-click on it. Open the nested menu and select Control Panel from the list of suggested apps.
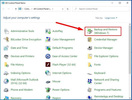
In the window All Control Panel Items find and select Backup and Restore (Windows 7).
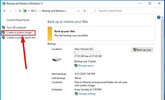
In this page, hit the link Create a system image in the left-side panel.
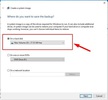
In the new window, look under the heading Where do you want to save the backup?and check the option for On a hard disk to indicate where your backup will be stored.
With the nested menu, select the local disk where you’d like to save your backup. Try to have that location on a physical disk different from the one you are backing things up from, because if the entire physical disk fails, you risk to lose all your backups. After that, click Next to continue.
By default, when you create a system image, the backup only includes the disks required to start your Windows 10. You can add any disks to be included into the backup by checking their boxes in the corresponding window.
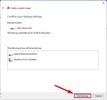
In the section Confirm your backup settings check the settings you selected to create the system image, including location of the future backup and the disks selected for this process, and then hit Start backup set things going.
When it is over, the tool will create a full backup of your device including all data on the main hard disk and other disks which you may have selected for backup.
Also, the operating system will suggest creating a system repair disk for use in cases when the computer is unable to boot correctly. However, you can skip this part and use a bootable flash drive to access system restore options, if necessary.
How to protect files with OneDrive in Windows 10
OneDrive offers protection from ransomware, and stores selected files as permitted by the user to reduce the use of local storage to a minimum. It also features integrated functions that let you exchange various data, synchronize users settings in Windows 10, offers protection for BitLockerrecovery keys and many other useful options.
All data saved to the remote cloud service OneDrive will be available to you from anywhere in the world, including from another computer working under Windows 10 and macOS, as well as from mobile devices based on Android and iOS.
Back up contents of the folders Desktop, Documents and Pictures
In addition to its main functions, OneDrive cloud storage service also lets you backup files stored in such folders as Desktop, Documents and Pictures, without having to move their contents to the OneDrive folder.
To back up selected folders in Windows 10 to OneDrive storage, here’s what you do.
On the Taskbar, look at the lower right corner and click on the cloud-shaped icon of Microsoft OneDrive shown near the notifications area.
In the vertical panel that appears, click More.
Select Settings from the context menu that appears.
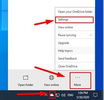
In the window that opens, jump to the tab Auto Save.
In the section Protect your important foldersclick on the button Update folders.

The OneDrive window will show you folders Desktop, Documents and Pictures. Make sure that each of them is selected (it can be seen by the darker color of the folder and a tick mark). If necessary, select each folder.
When it’s done, click on Start protection.
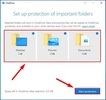
When you complete these steps, documents and other files stored inside each of the said folders will be safely uploaded to OneDrive cloud service from your account.
How to protect your Windows 10 laptop from fraudsters and viruses
To ensure security of your laptop and all the information you have on it, you can always use third-party solutions from trusted developers and antivirus software that offer both free products for basic protection and advanced commercial solutions providing multi-level and varied protection security options within a single software complex. However, the latest operating system Windows 10 comes supplied with a powerful antivirus and firewall which are perfectly sufficient to protect your computing device and its files against various viruses, other malware and hacking attempts.
Run a full scan for viruses with Windows Defender
The built-in antivirus inside Windows 10 is enabled by default and ready to protect your laptop against almost every kind of malware, including viruses, spyware and ransomware. However, it is recommended to run a full scan from time to time and check your computer for hidden malware, especially if you notice a significant slowdown in how the laptop works and processes data.
To run such a scan meant to detect and remove malware from your computer, take the steps described below:
Open the Windows 10 antivirus in any way you prefer. For example, open the Settings app in any way you like, and scroll down until you see Update & Security.
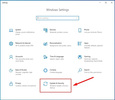
In the left-side panel, select Windows Security, and then jump to Open Windows Security on the right.
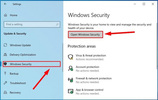
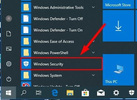
Otherwise, open the main Windows menu by clicking on the Start button in the lower left corner of your desktop, on the Taskbar. Scroll down the list of installed apps and system services to find and select Windows Security.
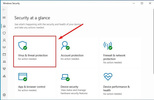
In the main page of your security center, click on Virus & threat protection.
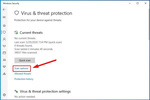
In the Current threats section click on the link Scan options.
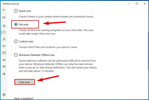
The service will display available scan types. Check the option for Full scan to run a full-scale virus check.
Then hit the button Scan now to start detecting and isolating any malware that your computer may contain.
Windows Defender will scan the laptop and remove any elements that its internal security system believes to be malicious.
Enable Windows Firewall
As an additional security tool to improve computer protection, Windows 10 also includes Windows Firewall, whose main goal is to restrict unauthorized access of third parties to user networks; in other words, it filters network data streams to make sure no one gets to control your PC or modify or steal your data.
This built-in firewall should be enabled by default. If it isn’t, you can always turn it on by taking these steps below:
Open the Windows Security service in any way you know (or any way we described in this article).
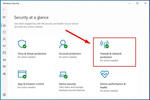
In the security overview page, select the tab Firewall & network protection.
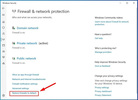
In the related page, click on the button Restore firewalls to default.
After that, the firewall will operate in a full-featured mode and protect your device and data from all kinds of network threats.
If you are using a third-party antivirus and firewall, visit their developer’s website for more information on how to enable and manage these products.
See the full article with all additional video tutorials.
===========
Источник:
habr.com
===========
Похожие новости:
- [Data Mining, Data Engineering] How to Recover RAID 5 Data from SAN D-Link DSN-1100
- [Анализ и проектирование систем, Data Mining, Управление проектами, Исследования и прогнозы в IT] Ваш звонок очень важен для нас: как перестать разочаровываться в контакт-центрах и начать жить
- [Data Mining, Data Engineering] How to Create a RAID 5 System With LVM Tool and Recover Data After Failures
- [Информационная безопасность, Системное администрирование, IT-компании] Microsoft подтвердила проблемы с мартовскими обновлениями для различных версий Windows 10
- [Работа с 3D-графикой, Разработка под Windows, Софт] Из Windows 10 удалят Paint 3D и 3D Viewer
- [Браузеры, Исследования и прогнозы в IT, Медийная реклама, Контекстная реклама] Исследование: восприятие скорости работы браузера зависит от публикаций в СМИ
- [Data Mining, Открытые данные] Винный гид России. Аналитика
- [IT-инфраструктура] Обновление и продление поддержки Windows на банкоматах, платежных киосках и кассах
- [Data Mining, Машинное обучение, Бизнес-модели, Финансы в IT] О рынке Data Science и машинного обучения
- [Системное администрирование, Софт, IT-компании] В Windows 10 Insider Preview Build 21322 Microsoft закрыла возможность вызвать баг для повреждения файловой системы NTFS
Теги для поиска: #_data_mining, #_microsoft_edge, #_windows_10, #_laptop, #_storage, #_settings., #_data_mining, #_microsoft_edge
Вы не можете начинать темы
Вы не можете отвечать на сообщения
Вы не можете редактировать свои сообщения
Вы не можете удалять свои сообщения
Вы не можете голосовать в опросах
Вы не можете прикреплять файлы к сообщениям
Вы не можете скачивать файлы
Текущее время: 15-Янв 09:25
Часовой пояс: UTC + 5
| Автор | Сообщение |
|---|---|
|
news_bot ®
Стаж: 7 лет 11 месяцев |
|
|
Read this article to find out how to get your laptop ready for all kinds of tasks without paying extra. And how to configure Windows 10 in the best way. We will explore how to maintain Windows 10, configure system security and laptop power settings, what software to install and how to connect peripherals. Here is the best all-round guide for you!  Introduction In this guide, we will tell you about twelve easy methods to improve overall performance of your Windows 10 laptops, including steps for clearing junk files, optimizing the operating system and battery charge consumption, configuring security settings and installing additional apps. How to free up disk space with the help of Storage settings in Windows 10 In Windows 10, there is a section entitled Storage that manages the local hard disk of your laptop and contains various storage settings. Use it for an easy way to remove unnecessary files from the system disk as well as other internal and external storage devices. Using the functionality of this section, you can quickly get rid of outdated setup and temporary files in order to free disk space fro more important data and improve disk efficiency. In Windows 10, all main settings for the operating system, installed applications and services are concentrated into the unified and multifunctional application, Settings. There are several ways to access it. Right-click on the Start button or press the keyboard shortcut Windows + X to open the context menu and select Settings.   Remove temporary files manually To delete temporary files from your Windows 10 laptop, just do the following. Open the Settings app in any way you prefer. In the main page, click on the System tab.  In the left side of the Windows 10 settings panel, select Storage. Now look to the right, find the section Storage sense and click on the link Free up space now (for Windows 10 with the official October 2018 Update or an earlier version).  For Windows 10 version 1903look to the right to find the section Windows 10 (C:) and click on Temporary files.  In the new page, the operating system will scan the available disk space, find and identify temporary files, arrange them by their properties and prepare them for being removed.  When the operations are accomplished, you will see the entire list of all discovered items. Check the files suggested for removal with the help of the description that includes the following lines:
Hint: Elements available for removal may differ depending on the version of the operating system and applications installed on a specific computer. Also, you may have noticed that we do not mention the Downloads folder. If you plan to select it, make sure it doesn’t contain any mission-critical files before clearing its contents. Select items for removal by checking the corresponding boxes and click Remove files.  The operating system will clear the selected elements immediately and free up disk space for storing more important user data. Remove temporary files automatically To configure automatic cleaning disk space from files you don’t need any longer, do the following in the Storage section. Open the Settings app in any way you like. In the main page, click on the System tab again.  Select Storage on the left. In the right panel, find the section Storage sense and drag the slider into On position to enable automatic disk space cleaning for the hard disk in your laptop.  After that, click Change how we free up space automatically below, or jump to the page where cleaning settings can be changed (just as before, we are describing the sequence of actions for Windows 10 with the October 2018 update or an earlier version).  For version 1903, go to the same Storage section and drag the slider for storage sense to the On position, and then use the link Configure Storage Sense or run it now to access a similar settings page.  In the section Storage Sense, use the dropdown menu Run Storage Sense and select one of the predefined time intervals for automatic start:
 In the next section Temporary files check the box for Delete temporary files that my apps aren’t using.  After that, set the time range for removal of deleted files from the Recycle Bin of your operating system. Use the dropdown menu Delete files in my recycle bin if they have been there for over and select the time interval, after which the bin is going to be emptied automatically.  After that, set the time interval in the dropdown menu Delete files in my Downloads folder if they have been there for over, to decide how long files downloaded from the Internet should be stored before they are removed automatically.  Advice: If you want to remove as may files as possible, choose the option 1 day. Bear in mind, though, that the Downloads folder may contain personal or important files, so it is recommended to back up all the files you need for the future before you proceed with automatic cleaning. Now, find the section Locally available cloud content, open the dropdown menu Content will become online-only if not opened for more than and select the maximal number of days after which the files that have not been used for a long time will be removed from the hard disk of your laptop – on condition, though, that their synchronized backup copy is saved to the cloud storage, OneDrive.  In the section Free up space now, check the box for Delete previous versions of Windows (if such line is displayed). With this option available, you may gain from 10 to 20 GB of additional free space. Summing up, in the section Free up space now click on the button Clean now to start the process of removing the files according to the settings you have chosen in this page.  When all these actions are performed, some extra free space will appear in the hard disk of your laptop, or (depending on the settings) the automatic cleaning will run to optimize the storage device. How to remove unnecessary apps in Windows 10 In order to remove unnecessary applications and games from Windows 10, here are the steps to take: Open the Settings app in any way we have shown before. In the main page, select the tab Apps.  In the left panel, look for Apps & features. Click on it, and on the right, you will see all integrated and user-installed apps currently available for this computer. Scroll down or drag the slider down to navigate the list and find the application you’d like to remove in order to gain more free space. Advice: Click on the arrow Sort by to display the dropdown menu and choose the option Size, to see the applications that take up most space on the storage of your device.  Left-click on the selected application and then choose Uninstall. The operating system will ask you to confirm your choice. Click the Uninstall button again in the system notification This app and its related info will be uninstalled.  The selected application will be removed and the disk space required for its installation and system files will be cleaned. Repeat the steps for other applications and games until the hard disk of your laptop is free from the programs you don’t need any longer. How to update your Windows 10 to the latest version available Keeping Windows 10 up to date lets users access the latest system features and improvements introduced and tested by Microsoft. Besides, updating Windows 10regularly is the best way to make sure that your computer has the latest security updates capable of defending your files and programs from all kinds of network threats. Update Windows 10 to the latest version with Windows Update service In order to update Windows 10 to the latest version with Windows Update service, follow these steps. Open the Settings app in any way you prefer. Scroll down to reach the bottom of the list and select Update & Security.  In the left-side panel, click on Windows Update. If the operating system doesn’t show you an invitation to update it to the latest version automatically, click on the button Check for updates to find out if your machine is ready for the official update package.  When the check is complete, click on the link Download and install now, that you can find in the section Feature update to Windows 10…. (The package containing new features and security improvements will only be available if your computing device is fully compatible with the suggested updates).  Then hit the button Restart now, to have the operating system prepare your laptop for installing system packages of the latest Windows 10 version. Update Windows 10 to the latest version with Update Assistant If your laptop doesn’t shown any suggestions to update its operating system to the latest version, but you are confident that your device is absolutely compatible with it and ready for installation, you can have it done with Update Assistant. In order to install the new version of Windows 10 with the help of Update Assistant, just do the following. Open any web browser and visit the Microsoft official website offering support for all of their products. In the section Windows … Update now available click on Update now.  When the download is over, double-click on the executable file Windows10Upgrade to start the system update tool. When the User Account Control system asks you Allow this application to make changes to your device? click Yes, and the Update Assistant will start. In the Update Assistant window, click Update now.  When the computer is checked for compatibility and installation of updates is possible, click Next.  The Update Assistant will start downloading the latest Windows 10 updates and get them ready.  When the process is over, click on Restart now.  When you complete all these steps, the Update Assistant for Windows 10 will update your laptop to the latest version while saving user files, and leaving applications and most settings unchanged.  Click Exit when everything is done, and you will see your laptop now having the latest version of the operating system. How to shorten the list of apps that start with Windows 10 Many applications that people install on their laptops may change permissions and include themselves into the startup list so they can boot together with the operating system. Sometimes, they even configure additional background services to run at startup as well. Despite the fact that having third-party apps start with the operating system is sometimes an advantage, several such processes starting at the same time may have a serious impact on how quickly the laptop boots, reduce the time it can work on battery and affect overall system performance. That is why if your Windows 10 starts with a bunch of other apps which you don’t need right when your computer is ready for work, you can disable them, and here is how. Open the Settings app using one of the methods we showed before. In the main page, select the tab Apps.  In the left panel, jump to Startup. When you look to the right, you will see the panel where you can decide which apps should start with the operating system. In the lines of corresponding applications which can affect system performance at startup, set the slider to the Off position, and the next time you boot your computer, these apps won’t start in the background.  Advice: Open the dropdown menu Sort by with clicking on the downward arrow, and select the option Startup impact to arrange applications in a descending order by how they affect system performance when booting with Windows. Despite their attempts to reduce the number of such applications to a minimum, most users tend to never disable startup for Microsoft services like OneDrive and Windows Security Notification.  When certain applications are removed from the startup list, the operating system of your laptop should boot much faster. How to back up the system drive of your Windows 10 laptop Complete data backup for all information stored on your laptop is probably one of the best ways to secure user data against unexpected loss due to hardware failures, system errors, software compatibility issues, malware activities or theft attempts. With all those advanced third-party tools for data backup, there is nothing to prevent you from using the good old utility to create a system image directly inside your Windows 10. Important information: At the moment, users can still use system tools to create a system image. but it may be disabled in the future. With further official updates for Windows 10, Microsoft may decide to remove them from the list of integrated services. As the tool for creating a system image was introduced back in earlier versions of Windows, it can be accessed directly from the Control Panel application. Initially, this app contains all main settings of the operating system, but beginning with Windows 8.1 developers started moving them to the new application, Settings, in order to display settings within a more advanced platform. Meanwhile, Control Panel only duplicates functions of the new app and contains specific tools, including Backup and Restore. To create a complete backup of the data you store on your laptop, there is a sequence of steps to take. Open the Control Panel app in any way you know. For example, click on the Start button which you can find in the lower left corner of the Taskbar to open the main Windows menu. Scroll down the list of available apps and services, find the section Windows System and left-click on it. Open the nested menu and select Control Panel from the list of suggested apps.  In the window All Control Panel Items find and select Backup and Restore (Windows 7).  In this page, hit the link Create a system image in the left-side panel.  In the new window, look under the heading Where do you want to save the backup?and check the option for On a hard disk to indicate where your backup will be stored. With the nested menu, select the local disk where you’d like to save your backup. Try to have that location on a physical disk different from the one you are backing things up from, because if the entire physical disk fails, you risk to lose all your backups. After that, click Next to continue.  By default, when you create a system image, the backup only includes the disks required to start your Windows 10. You can add any disks to be included into the backup by checking their boxes in the corresponding window. In the section Confirm your backup settings check the settings you selected to create the system image, including location of the future backup and the disks selected for this process, and then hit Start backup set things going.  When it is over, the tool will create a full backup of your device including all data on the main hard disk and other disks which you may have selected for backup. Also, the operating system will suggest creating a system repair disk for use in cases when the computer is unable to boot correctly. However, you can skip this part and use a bootable flash drive to access system restore options, if necessary. How to protect files with OneDrive in Windows 10 OneDrive offers protection from ransomware, and stores selected files as permitted by the user to reduce the use of local storage to a minimum. It also features integrated functions that let you exchange various data, synchronize users settings in Windows 10, offers protection for BitLockerrecovery keys and many other useful options. All data saved to the remote cloud service OneDrive will be available to you from anywhere in the world, including from another computer working under Windows 10 and macOS, as well as from mobile devices based on Android and iOS. Back up contents of the folders Desktop, Documents and Pictures In addition to its main functions, OneDrive cloud storage service also lets you backup files stored in such folders as Desktop, Documents and Pictures, without having to move their contents to the OneDrive folder. To back up selected folders in Windows 10 to OneDrive storage, here’s what you do. On the Taskbar, look at the lower right corner and click on the cloud-shaped icon of Microsoft OneDrive shown near the notifications area. In the vertical panel that appears, click More. Select Settings from the context menu that appears.  In the window that opens, jump to the tab Auto Save. In the section Protect your important foldersclick on the button Update folders.  The OneDrive window will show you folders Desktop, Documents and Pictures. Make sure that each of them is selected (it can be seen by the darker color of the folder and a tick mark). If necessary, select each folder. When it’s done, click on Start protection.  When you complete these steps, documents and other files stored inside each of the said folders will be safely uploaded to OneDrive cloud service from your account. How to protect your Windows 10 laptop from fraudsters and viruses To ensure security of your laptop and all the information you have on it, you can always use third-party solutions from trusted developers and antivirus software that offer both free products for basic protection and advanced commercial solutions providing multi-level and varied protection security options within a single software complex. However, the latest operating system Windows 10 comes supplied with a powerful antivirus and firewall which are perfectly sufficient to protect your computing device and its files against various viruses, other malware and hacking attempts. Run a full scan for viruses with Windows Defender The built-in antivirus inside Windows 10 is enabled by default and ready to protect your laptop against almost every kind of malware, including viruses, spyware and ransomware. However, it is recommended to run a full scan from time to time and check your computer for hidden malware, especially if you notice a significant slowdown in how the laptop works and processes data. To run such a scan meant to detect and remove malware from your computer, take the steps described below: Open the Windows 10 antivirus in any way you prefer. For example, open the Settings app in any way you like, and scroll down until you see Update & Security.  In the left-side panel, select Windows Security, and then jump to Open Windows Security on the right.  Otherwise, open the main Windows menu by clicking on the Start button in the lower left corner of your desktop, on the Taskbar. Scroll down the list of installed apps and system services to find and select Windows Security.  In the main page of your security center, click on Virus & threat protection.  In the Current threats section click on the link Scan options.  The service will display available scan types. Check the option for Full scan to run a full-scale virus check. Then hit the button Scan now to start detecting and isolating any malware that your computer may contain.  Windows Defender will scan the laptop and remove any elements that its internal security system believes to be malicious. Enable Windows Firewall As an additional security tool to improve computer protection, Windows 10 also includes Windows Firewall, whose main goal is to restrict unauthorized access of third parties to user networks; in other words, it filters network data streams to make sure no one gets to control your PC or modify or steal your data. This built-in firewall should be enabled by default. If it isn’t, you can always turn it on by taking these steps below: Open the Windows Security service in any way you know (or any way we described in this article). In the security overview page, select the tab Firewall & network protection.  In the related page, click on the button Restore firewalls to default.  After that, the firewall will operate in a full-featured mode and protect your device and data from all kinds of network threats. If you are using a third-party antivirus and firewall, visit their developer’s website for more information on how to enable and manage these products. See the full article with all additional video tutorials. =========== Источник: habr.com =========== Похожие новости:
|
|
Вы не можете начинать темы
Вы не можете отвечать на сообщения
Вы не можете редактировать свои сообщения
Вы не можете удалять свои сообщения
Вы не можете голосовать в опросах
Вы не можете прикреплять файлы к сообщениям
Вы не можете скачивать файлы
Вы не можете отвечать на сообщения
Вы не можете редактировать свои сообщения
Вы не можете удалять свои сообщения
Вы не можете голосовать в опросах
Вы не можете прикреплять файлы к сообщениям
Вы не можете скачивать файлы
Текущее время: 15-Янв 09:25
Часовой пояс: UTC + 5
