[Антивирусная защита] Kaspersky Removed an Important File, What To Do?
Автор
Сообщение
news_bot ®
Стаж: 7 лет 11 месяцев
Сообщений: 27286
Read this article to find out what to do if an antivirus removed important files and how to recover them. What is a quarantine and how to configure exclusions for an antivirus? Learn more about causes of data loss and available effective methods to restore missing user files.

Introduction
The harmful effects of viruses may result in all kinds of damage to your data: erasing, encrypting, overwriting, destroying system files and file allocation tables, and other unpleasant consequences that affect the work of certain hardware elements, or the computer in general.
The antivirus activities meant to combat all kinds of malware may sometimes lead to situations when certain important user files are removed by the antivirus trying to cure the operating system or repair consequences of a virus attack. In this article, we will tell you what to do if an antivirus removed the files you need, and how they can be recovered.
Why it is necessary to use an antivirus?
Security always comes first. In the times when computing technologies and data processing are developing rapidly, safe use and storage of information requires special attention and specialized software.
Viruses pose a most widespread threat for personal computers, and they can have a devastating effect on the data they store and the hardware they are made of.
Such malware can self-replicate and infect all devices connected to a computer and therefore provoke more serious issues. Malware effects include errors in the work of your computer or devices connected to it, which may provoke interruptions in your work and even result in loss of important data. That is why it vitally important to protect computing devices from malware and ensure safety of data, including its protection against unauthorized access.
Quarantine and exclusions settings in products by Kaspersky
Most virus developers are knowledgeable about the methodology of antivirus companies who strive to ensure computer safety and protect user data from various threats, and that is why they try to disguise virus activities to make them look as typical behavior of safe applications, or embed the malicious code into ordinary files.
Being the main element in the protection of personal computers and other digital devices, Kaspersky antivirus keeps user and system files secure from hacker attacks and malware intrusions. Following its internal settings, Kaspersky removes infected or dangerous files when they are detected, and this way, it prevents undesired effects for the operating system and secures all user data against devastating consequences. That is why may users can be surprised to find out that Kaspersky antivirus removes files automatically without asking for permission.
So if users prefer, on their own responsibility, to make independent decisions what to do when malicious objects and suspicious activities are spotted, they can disable automatic deletion of files in a few simple steps. Open the window of your Kaspersky antivirus or any other product by this company, and click the gear-shaped Settings button in the lower left corner of the screen. As an example, we’ll be using Kaspersky Internet Security, but the described algorithm is good for all company products.

In the settings window that opens, find the section Interactive protection and uncheck the box next to Perform recommended actions automatically.
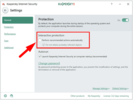
Now the automatic removal of harmful files which cannot be cured is disabled.
In this case, all detected harmful or suspicious files will be isolated and placed into the quarantine – a special storage for items whose activities raise doubts or which are considered to be dangerous for the computer and the data. The functionality of Kaspersky Lab products lets users recover important files from the quarantine in case they are removed by the antivirus.
To access the quarantine, open the main window and click the button More tools in the central panel.

In the new window that opens, select Quarantine from the list of available tools.

The new page will show you all backup copies of the files that have been removed or modified in the course of curing. Check the files you are looking for and click the button Restore, or right-click on the selected files and choose a corresponding option from the menu that appears.
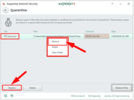
Now the files removed by Kaspersky antivirus will be restored.
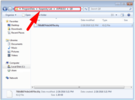
Physically, the quarantine and the files inside it can be found by following this path:
C:\ProgramData\Kaspersky Lab\AVP17.0.0\QB
Open the Windows File Explorer and follow this path, or paste it into the address bar for immediate direct access.
If you possess advanced skills in data security and are confident that certain files or apps are safe, you can add them to the Kaspersky exclusions list so the antivirus will not monitor them.
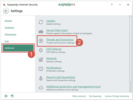
On the left panel of the settings window, go to Additional, and then click on the text link Threats and Exclusions in the right panel.
In the settings page that opens, find Exclusions and click on the text link Manage exclusions. In a similar way, you can configure the list of trusted applications by choosing the corresponding link Specify trusted applications, and the antivirus will ignore such applications when they start.
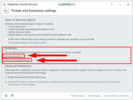
In the new pop-up window, click on the Add button.
In the next page, specify the file or folder you want to exclude from the antivirus monitoring by clicking the button Browse, set the object name or name mask according to the Virus Encyclopedia, select corresponding protection components and then click Add for the changes to take effect.

The status Active sets the exclusions list, and the antivirus won’t be checking the selected files and folders, while the status Inactive means this rule is ignored and the antivirus will check everything without missing a single file.
Find deleted files with integrated Windows tools
If you can’t find your files and think they have been removed, but they are missing from the quarantine either, don’t panic: there are other ways to help you get your data back.
First of all, you need to make sure that the missing files were really erased and not just sent to the Windows Recycle Bin which is the typical directory for temporary storage of deleted items. This idea seems so obvious, but we mean exactly what we say: always check the Windows Recycle Bin for the files you think are gone. Sometimes, they end up right there, and all your trouble can be over the very second you open the Recycle Bin.
The next step in restoring the files you need is to use integrated features of your Windows to recover the lost data from backups you may have created previously.
The essential condition for using a backup copy to recover lost or deleted data is to have the backup feature configured and enabled in advance. If files are already missing, you can’t recover anything from a backup copy – because you can’t archive what is gone. That is why turning the backup feature in advance is crucial. You can learn more about various backup options in the “Windows” operating system, their advantages and preferred settings from our video review:
Извините, данный ресурс не поддреживается. :(
Some applications in Windows may synchronize their data with the cloud storage service OneDrive, which is also a good choice for keeping backup copies of certain documents. Do not exclude this opportunity and check the cloud storage too. You may find copies of the missing files there, and there will be no need to search for them elsewhere.
If the backup feature has been enabled in advance, recovering files won’t take too long, and there are several ways to do it.
Recovering files from a backup to the current directory
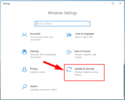
You can start recovering files with the tool named Backup and Restore (Windows 7) in one of the following ways: from the Settings app (in Windows, it combines all of the most essential settings and controls) or from the Control Panel. For example, open the Settings app by pressing the key shortcut Windows + I. Scroll down to the section Update and Security below.
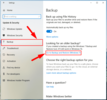
In the left panel of the new window, find the line Backup, look to the right to find Looking for an older backup? and click on the hyperlink Go to Backup and Restore (Windows 7).
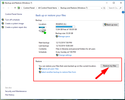
The backup and restore window will open, and you’ll be able to start the recovery process by clicking on the button Restore my files in the Restore section.
The operating system will launch the data recovery process; in the new window Restore Files it will suggest you to select files and folders from available backups for further restoration using the following control buttons: Search, Browse for files or Browse for folders.
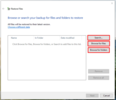
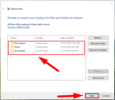
Use any of the buttons to find the files or folders that you need and add them to the recovery list which you will see in the central panel. After that, click Next to continue.
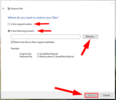
In the following window, select location for saving the recovered files. You can either choose the original directory where the files used to be stored before deletion, or specify another directory where they should be saved using the Browse button. Finally, click on the Restore button to complete the operation.
Recovery from previous versions
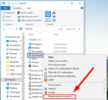
This method is quite easy and lets you restore latest versions of files and folders from their previously saved copies. Open the Windows File Explorer in any way you prefer: from the main Windows menu, by double-clicking the desktop shortcut or by clicking on the File Explorer icon on the Taskbar in the lower left corner of the screen. In the window that opens, browse to the directory where you used to store the files, select the logical disk, partition or a specific folder, and then right-click on the selected item. A context menu appears; from the list of available actions, select Restore previous versions.
In the Properties window for the selected item, find the tab Previous Versions to see all previous versions of this item saved automatically in accordance with the backup settings you have configured. Select the version you need from the list and restore the data you are looking for.

It should be noted, though, that using this method to restore files means overwriting the currently existing item with its earlier version which you selected. It means that you won’t be able to bring back the currently existing item as long as you overwrite it this way, so always keep this aspect in mind when choosing to use this particular method to restore your data.
Recovering deleted files with File History
An outstanding advantage of this method is the opportunity to set and then increase the total number of specific folders which you want to back up and which could be restored in case the original items are lost, damaged or removed. You can change the amount of data for backup and be confident of the guaranteed recovery.
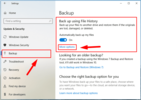
Open the Settings app and select Update and Security just as shown before in this article. In the left panel, select Backup and click on the hyperlink More options in the right panel (you can find it in the section Back up using File History.
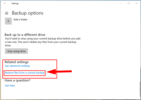
In the Backup Options window that opens, scroll down to Related Settings and click on the hyperlink Restore files from a current backup.
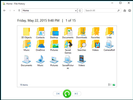
The File History home screen will show you all archived versions of the selected folders that Windows has backed up automatically according to your preferences. The archives arranged by date will be kept for an unlimited period of time. Using the navigation buttons in the lower part of the window you can switch between versions of backups saved for a certain date, and select the one you need. As soon as you select the necessary files and folders in the central panel, click on the green round button with the circling arrow inside – Restore to original location – and the selected items will be restored immediately and ready for use.
You can learn more about backup options for user data in Windows by visiting our channel and watching the video tutorial How to Set Up and Configure File History in Windows 10 and 8.
Извините, данный ресурс не поддреживается. :(
Restore files deleted by an antivirus with a third-party file recovery program
If you tried using the file recovery methods described above but still failed to find and restore the lost data, it’s time to use professional data recovery tools.
The work of such utilities is mostly based on peculiarities of file storage (which are more or less similar for all file systems). Any data is stored on a hard disk according to a rigidly structured matrix format, which serves as the basis to enable all kinds of operations involving files, including their search and allocation.
For most types of disk storage, files are not destroyed right after being deleted. Instead, only certain indicators are erased (they contain detailed information on the files, such as size, number of clusters occupied, location on the disk etc), and the disk space occupied by such files is marked as free for writing new data. This approach helps to reduce greatly the time needed to delete files, especially big ones. In fact, though, the files are still available on the disk until the operating system, basing on its own priorities, overwrites the disk space occupied by such files (which are marked as deleted) – and that means the files can be recovered.
However, for some disks, such as solid-state drives, the command for deletion actually means erasing the deleted file immediately – it happens because of the special function known as TRIM, which is meant to accelerate the read/write operations with the disk. Recovering such files is next to impossible.
If you noticed that some files are missing, stop any actions that involve downloading, writing or copying data to such disk, in order to prevent overwriting deleted files and reduce the chances for irreversible data loss. Your next step should be using specialized data recovery software. Professional tools can help you find deleted files after malware activities or deletion by mistake, by scanning the disk contents without considering the file allocation table, running an in-depth signature analysis and putting fragments together into a single file.
On the Internet you can find a wide range of software tools for data recovery, and they differ by their functionality greatly.
However, based on results of professional tests by trusted companies, massive feedback from end users, and taking into account the impressive recovery rate, it’s worth considering Hetman Partition Recovery by Hetman Software.
Its innovative data recovery algorithms make it possible not only to recover files after ordinary or permanent deletion, but also restore data after formatting or removing partitions and entire disks, from damaged file systems, after system and hardware errors, operating system crashes, and even save data from inaccessible, unreadable and physically damaged disks.
However, the man advantage is its ability to restore any information destroyed or blocked after a virus attack, and do it almost in full. No matter what kind of malware hits your computer or what scenario it follows (destruction of data, restricted or blocked access to data, modification or removal of data), Hetman Partition Recovery always succeeds in extracting your data from infected hard disks.
The program is available for download from the Hetman Software official website. After you download and run it, it can be installed within a few minutes to any computer running any version of Windows.
The integrated step-by-step wizard makes it easier to install and use the utility even for beginners.
When the installation is over, run Hetman Partition Recovery, and the program will scan the computer for the first time and display all connected data storage devices.
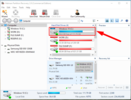
The interface looking very similar to the File Explorer in Windows 10 will help even the least experienced users to quickly find their way through the settings and select the logical or physical disk for analysis. The integrated file recovery wizard will suggest you to decide on the analysis type you’d like to use for searching and restoring the lost data. When you have chosen the analysis type, click Next to start searching. If the files were lost as a result of malware or antivirus activities, the best solution would be to use Full analysis to find all available data and restore the file system of the selected storage device, in case it was damaged.
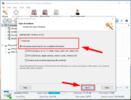
Analyzing the selected device will take some time depending directly on a variety of factors: the memory size of the storage device, the extent of possible damage to the information, the current file system, the amount of lost data etc. The progress bar will show you in the process flow real-time mode.
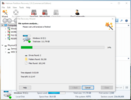
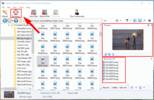
When the analysis is over, you’ll be able to find all recovered files in the program’s man window, and view the contents of each file in the preview window before deciding on which file to save. The preview option is most useful as it lets you see the contents of documents, tables, archives, and watch videos, view pictures, and even listen to sound files – all of that is available in any version of this tool. Having chosen the files, drag them onto the Recovery List and click the button Recovery on the main panel.
Follow hints of the step-by-step recovery wizard to select one of the four methods recommended for saving the recovered files: save to an internal or external storage device, write to an optical disk (CD/DVD), create an ISO virtual image or upload files to the Internet with the FTP client.
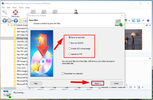
Finally, specify the saving path and some other settings which differ depending on the method you have chosen, and save the selected files.
Now all deleted files are back and ready to use.
Conclusion
The increasingly growing volumes of data and its total digitalization makes users think about its safekeeping and using it in a secure environment.
The wide range of products offered by Kaspersky Lab are most important tools to protect computers from various network threats and harmful effects of malware. An antivirus can protect the user’s device and all their data from possible virus attacks and repeal any infiltration attempts by removing viruses and infected files. However, sometimes the antivirus can go nuclear and remove important user files which calls for data recovery solutions.
Al antivirus products by Kaspersky Lab feature an integrated tool protecting your data from being deleted by mistake: it’s the quarantine, and it stores safe copies of deleted files and virus threats. Just check the quarantine, as there are high chances you can find the missing files there.
If the important files are gone, and you can’t see them in the quarantine, you can always use special functions of Windows 10, provided that the backup feature has been configured and enabled in advance.
Saving backup copies of important files regularly and automatically will help you restore information from the previously created copies, should you encounter unexpected loss of data.
In addition to the system-integrated features, or when a backup is missing or damaged, you can still resort to professional data recovery tools like Hetman Partition Recovery, and have all your lost files back – with a guarantee.
If you still have questions about recovering files after they were removed by Kaspersky products, leave a comment, and we will answer you without fail.
See the full article with all additional video tutorials.
===========
Источник:
habr.com
===========
Похожие новости:
- [Восстановление данных] Файловая система HFS+: тестируем программы для восстановления данных
- [] BIOS Beep Codes for Troubleshooting
- [] Сравнение известного ПО, способного восстанавливать данные с накопителей ReFS
- [] Files Are Gone After Updating Windows 10… How to Recover Them?
- [Информационная безопасность, Антивирусная защита] Фишинг и с чем его едят
- [Системное администрирование, IT-инфраструктура, NoSQL, Big Data] Elasticsearch: сайзинг шардов как завещал Elastic + анонс вебинара + предложения по митапу
- [Информационная безопасность, NoSQL, Big Data, Софт] Определение объёма кластера Elasticsearch и тестирование производительности в Rally
- [CMS, Разработка веб-сайтов, Антивирусная защита, Программирование, 1С] Сказ о том, как я с гидрой боролся
- [Системное программирование, Разработка под Linux] Сила bash
- [Информационная безопасность, Антивирусная защита, IT-инфраструктура] Приглашаем к бета-тестированию Dr.Web Enterprise Security Suite 13.0
Теги для поиска: #_antivirusnaja_zaschita (Антивирусная защита), #_kaspersky, #_delete, #_file, #_restore, #_blog_kompanii_hetman_software (
Блог компании Hetman Software
), #_antivirusnaja_zaschita (
Антивирусная защита
)
Вы не можете начинать темы
Вы не можете отвечать на сообщения
Вы не можете редактировать свои сообщения
Вы не можете удалять свои сообщения
Вы не можете голосовать в опросах
Вы не можете прикреплять файлы к сообщениям
Вы не можете скачивать файлы
Текущее время: 15-Янв 10:31
Часовой пояс: UTC + 5
| Автор | Сообщение |
|---|---|
|
news_bot ®
Стаж: 7 лет 11 месяцев |
|
|
Read this article to find out what to do if an antivirus removed important files and how to recover them. What is a quarantine and how to configure exclusions for an antivirus? Learn more about causes of data loss and available effective methods to restore missing user files.  Introduction The harmful effects of viruses may result in all kinds of damage to your data: erasing, encrypting, overwriting, destroying system files and file allocation tables, and other unpleasant consequences that affect the work of certain hardware elements, or the computer in general. The antivirus activities meant to combat all kinds of malware may sometimes lead to situations when certain important user files are removed by the antivirus trying to cure the operating system or repair consequences of a virus attack. In this article, we will tell you what to do if an antivirus removed the files you need, and how they can be recovered. Why it is necessary to use an antivirus? Security always comes first. In the times when computing technologies and data processing are developing rapidly, safe use and storage of information requires special attention and specialized software. Viruses pose a most widespread threat for personal computers, and they can have a devastating effect on the data they store and the hardware they are made of. Such malware can self-replicate and infect all devices connected to a computer and therefore provoke more serious issues. Malware effects include errors in the work of your computer or devices connected to it, which may provoke interruptions in your work and even result in loss of important data. That is why it vitally important to protect computing devices from malware and ensure safety of data, including its protection against unauthorized access. Quarantine and exclusions settings in products by Kaspersky Most virus developers are knowledgeable about the methodology of antivirus companies who strive to ensure computer safety and protect user data from various threats, and that is why they try to disguise virus activities to make them look as typical behavior of safe applications, or embed the malicious code into ordinary files. Being the main element in the protection of personal computers and other digital devices, Kaspersky antivirus keeps user and system files secure from hacker attacks and malware intrusions. Following its internal settings, Kaspersky removes infected or dangerous files when they are detected, and this way, it prevents undesired effects for the operating system and secures all user data against devastating consequences. That is why may users can be surprised to find out that Kaspersky antivirus removes files automatically without asking for permission. So if users prefer, on their own responsibility, to make independent decisions what to do when malicious objects and suspicious activities are spotted, they can disable automatic deletion of files in a few simple steps. Open the window of your Kaspersky antivirus or any other product by this company, and click the gear-shaped Settings button in the lower left corner of the screen. As an example, we’ll be using Kaspersky Internet Security, but the described algorithm is good for all company products.  In the settings window that opens, find the section Interactive protection and uncheck the box next to Perform recommended actions automatically.  Now the automatic removal of harmful files which cannot be cured is disabled. In this case, all detected harmful or suspicious files will be isolated and placed into the quarantine – a special storage for items whose activities raise doubts or which are considered to be dangerous for the computer and the data. The functionality of Kaspersky Lab products lets users recover important files from the quarantine in case they are removed by the antivirus. To access the quarantine, open the main window and click the button More tools in the central panel.  In the new window that opens, select Quarantine from the list of available tools.  The new page will show you all backup copies of the files that have been removed or modified in the course of curing. Check the files you are looking for and click the button Restore, or right-click on the selected files and choose a corresponding option from the menu that appears.  Now the files removed by Kaspersky antivirus will be restored. Physically, the quarantine and the files inside it can be found by following this path: C:\ProgramData\Kaspersky Lab\AVP17.0.0\QB Open the Windows File Explorer and follow this path, or paste it into the address bar for immediate direct access.  If you possess advanced skills in data security and are confident that certain files or apps are safe, you can add them to the Kaspersky exclusions list so the antivirus will not monitor them. On the left panel of the settings window, go to Additional, and then click on the text link Threats and Exclusions in the right panel.  In the settings page that opens, find Exclusions and click on the text link Manage exclusions. In a similar way, you can configure the list of trusted applications by choosing the corresponding link Specify trusted applications, and the antivirus will ignore such applications when they start.  In the new pop-up window, click on the Add button. In the next page, specify the file or folder you want to exclude from the antivirus monitoring by clicking the button Browse, set the object name or name mask according to the Virus Encyclopedia, select corresponding protection components and then click Add for the changes to take effect.  The status Active sets the exclusions list, and the antivirus won’t be checking the selected files and folders, while the status Inactive means this rule is ignored and the antivirus will check everything without missing a single file. Find deleted files with integrated Windows tools If you can’t find your files and think they have been removed, but they are missing from the quarantine either, don’t panic: there are other ways to help you get your data back. First of all, you need to make sure that the missing files were really erased and not just sent to the Windows Recycle Bin which is the typical directory for temporary storage of deleted items. This idea seems so obvious, but we mean exactly what we say: always check the Windows Recycle Bin for the files you think are gone. Sometimes, they end up right there, and all your trouble can be over the very second you open the Recycle Bin. The next step in restoring the files you need is to use integrated features of your Windows to recover the lost data from backups you may have created previously. The essential condition for using a backup copy to recover lost or deleted data is to have the backup feature configured and enabled in advance. If files are already missing, you can’t recover anything from a backup copy – because you can’t archive what is gone. That is why turning the backup feature in advance is crucial. You can learn more about various backup options in the “Windows” operating system, their advantages and preferred settings from our video review: Извините, данный ресурс не поддреживается. :( Some applications in Windows may synchronize their data with the cloud storage service OneDrive, which is also a good choice for keeping backup copies of certain documents. Do not exclude this opportunity and check the cloud storage too. You may find copies of the missing files there, and there will be no need to search for them elsewhere. If the backup feature has been enabled in advance, recovering files won’t take too long, and there are several ways to do it. Recovering files from a backup to the current directory You can start recovering files with the tool named Backup and Restore (Windows 7) in one of the following ways: from the Settings app (in Windows, it combines all of the most essential settings and controls) or from the Control Panel. For example, open the Settings app by pressing the key shortcut Windows + I. Scroll down to the section Update and Security below.  In the left panel of the new window, find the line Backup, look to the right to find Looking for an older backup? and click on the hyperlink Go to Backup and Restore (Windows 7).  The backup and restore window will open, and you’ll be able to start the recovery process by clicking on the button Restore my files in the Restore section.  The operating system will launch the data recovery process; in the new window Restore Files it will suggest you to select files and folders from available backups for further restoration using the following control buttons: Search, Browse for files or Browse for folders.  Use any of the buttons to find the files or folders that you need and add them to the recovery list which you will see in the central panel. After that, click Next to continue.  In the following window, select location for saving the recovered files. You can either choose the original directory where the files used to be stored before deletion, or specify another directory where they should be saved using the Browse button. Finally, click on the Restore button to complete the operation.  Recovery from previous versions This method is quite easy and lets you restore latest versions of files and folders from their previously saved copies. Open the Windows File Explorer in any way you prefer: from the main Windows menu, by double-clicking the desktop shortcut or by clicking on the File Explorer icon on the Taskbar in the lower left corner of the screen. In the window that opens, browse to the directory where you used to store the files, select the logical disk, partition or a specific folder, and then right-click on the selected item. A context menu appears; from the list of available actions, select Restore previous versions.  In the Properties window for the selected item, find the tab Previous Versions to see all previous versions of this item saved automatically in accordance with the backup settings you have configured. Select the version you need from the list and restore the data you are looking for.  It should be noted, though, that using this method to restore files means overwriting the currently existing item with its earlier version which you selected. It means that you won’t be able to bring back the currently existing item as long as you overwrite it this way, so always keep this aspect in mind when choosing to use this particular method to restore your data. Recovering deleted files with File History An outstanding advantage of this method is the opportunity to set and then increase the total number of specific folders which you want to back up and which could be restored in case the original items are lost, damaged or removed. You can change the amount of data for backup and be confident of the guaranteed recovery. Open the Settings app and select Update and Security just as shown before in this article. In the left panel, select Backup and click on the hyperlink More options in the right panel (you can find it in the section Back up using File History.  In the Backup Options window that opens, scroll down to Related Settings and click on the hyperlink Restore files from a current backup.  The File History home screen will show you all archived versions of the selected folders that Windows has backed up automatically according to your preferences. The archives arranged by date will be kept for an unlimited period of time. Using the navigation buttons in the lower part of the window you can switch between versions of backups saved for a certain date, and select the one you need. As soon as you select the necessary files and folders in the central panel, click on the green round button with the circling arrow inside – Restore to original location – and the selected items will be restored immediately and ready for use.  You can learn more about backup options for user data in Windows by visiting our channel and watching the video tutorial How to Set Up and Configure File History in Windows 10 and 8. Извините, данный ресурс не поддреживается. :( Restore files deleted by an antivirus with a third-party file recovery program If you tried using the file recovery methods described above but still failed to find and restore the lost data, it’s time to use professional data recovery tools. The work of such utilities is mostly based on peculiarities of file storage (which are more or less similar for all file systems). Any data is stored on a hard disk according to a rigidly structured matrix format, which serves as the basis to enable all kinds of operations involving files, including their search and allocation. For most types of disk storage, files are not destroyed right after being deleted. Instead, only certain indicators are erased (they contain detailed information on the files, such as size, number of clusters occupied, location on the disk etc), and the disk space occupied by such files is marked as free for writing new data. This approach helps to reduce greatly the time needed to delete files, especially big ones. In fact, though, the files are still available on the disk until the operating system, basing on its own priorities, overwrites the disk space occupied by such files (which are marked as deleted) – and that means the files can be recovered. However, for some disks, such as solid-state drives, the command for deletion actually means erasing the deleted file immediately – it happens because of the special function known as TRIM, which is meant to accelerate the read/write operations with the disk. Recovering such files is next to impossible. If you noticed that some files are missing, stop any actions that involve downloading, writing or copying data to such disk, in order to prevent overwriting deleted files and reduce the chances for irreversible data loss. Your next step should be using specialized data recovery software. Professional tools can help you find deleted files after malware activities or deletion by mistake, by scanning the disk contents without considering the file allocation table, running an in-depth signature analysis and putting fragments together into a single file. On the Internet you can find a wide range of software tools for data recovery, and they differ by their functionality greatly. However, based on results of professional tests by trusted companies, massive feedback from end users, and taking into account the impressive recovery rate, it’s worth considering Hetman Partition Recovery by Hetman Software. Its innovative data recovery algorithms make it possible not only to recover files after ordinary or permanent deletion, but also restore data after formatting or removing partitions and entire disks, from damaged file systems, after system and hardware errors, operating system crashes, and even save data from inaccessible, unreadable and physically damaged disks. However, the man advantage is its ability to restore any information destroyed or blocked after a virus attack, and do it almost in full. No matter what kind of malware hits your computer or what scenario it follows (destruction of data, restricted or blocked access to data, modification or removal of data), Hetman Partition Recovery always succeeds in extracting your data from infected hard disks. The program is available for download from the Hetman Software official website. After you download and run it, it can be installed within a few minutes to any computer running any version of Windows. The integrated step-by-step wizard makes it easier to install and use the utility even for beginners. When the installation is over, run Hetman Partition Recovery, and the program will scan the computer for the first time and display all connected data storage devices.  The interface looking very similar to the File Explorer in Windows 10 will help even the least experienced users to quickly find their way through the settings and select the logical or physical disk for analysis. The integrated file recovery wizard will suggest you to decide on the analysis type you’d like to use for searching and restoring the lost data. When you have chosen the analysis type, click Next to start searching. If the files were lost as a result of malware or antivirus activities, the best solution would be to use Full analysis to find all available data and restore the file system of the selected storage device, in case it was damaged.  Analyzing the selected device will take some time depending directly on a variety of factors: the memory size of the storage device, the extent of possible damage to the information, the current file system, the amount of lost data etc. The progress bar will show you in the process flow real-time mode.  When the analysis is over, you’ll be able to find all recovered files in the program’s man window, and view the contents of each file in the preview window before deciding on which file to save. The preview option is most useful as it lets you see the contents of documents, tables, archives, and watch videos, view pictures, and even listen to sound files – all of that is available in any version of this tool. Having chosen the files, drag them onto the Recovery List and click the button Recovery on the main panel.  Follow hints of the step-by-step recovery wizard to select one of the four methods recommended for saving the recovered files: save to an internal or external storage device, write to an optical disk (CD/DVD), create an ISO virtual image or upload files to the Internet with the FTP client.  Finally, specify the saving path and some other settings which differ depending on the method you have chosen, and save the selected files. Now all deleted files are back and ready to use. Conclusion The increasingly growing volumes of data and its total digitalization makes users think about its safekeeping and using it in a secure environment. The wide range of products offered by Kaspersky Lab are most important tools to protect computers from various network threats and harmful effects of malware. An antivirus can protect the user’s device and all their data from possible virus attacks and repeal any infiltration attempts by removing viruses and infected files. However, sometimes the antivirus can go nuclear and remove important user files which calls for data recovery solutions. Al antivirus products by Kaspersky Lab feature an integrated tool protecting your data from being deleted by mistake: it’s the quarantine, and it stores safe copies of deleted files and virus threats. Just check the quarantine, as there are high chances you can find the missing files there. If the important files are gone, and you can’t see them in the quarantine, you can always use special functions of Windows 10, provided that the backup feature has been configured and enabled in advance. Saving backup copies of important files regularly and automatically will help you restore information from the previously created copies, should you encounter unexpected loss of data. In addition to the system-integrated features, or when a backup is missing or damaged, you can still resort to professional data recovery tools like Hetman Partition Recovery, and have all your lost files back – with a guarantee. If you still have questions about recovering files after they were removed by Kaspersky products, leave a comment, and we will answer you without fail. See the full article with all additional video tutorials. =========== Источник: habr.com =========== Похожие новости:
Блог компании Hetman Software ), #_antivirusnaja_zaschita ( Антивирусная защита ) |
|
Вы не можете начинать темы
Вы не можете отвечать на сообщения
Вы не можете редактировать свои сообщения
Вы не можете удалять свои сообщения
Вы не можете голосовать в опросах
Вы не можете прикреплять файлы к сообщениям
Вы не можете скачивать файлы
Вы не можете отвечать на сообщения
Вы не можете редактировать свои сообщения
Вы не можете удалять свои сообщения
Вы не можете голосовать в опросах
Вы не можете прикреплять файлы к сообщениям
Вы не можете скачивать файлы
Текущее время: 15-Янв 10:31
Часовой пояс: UTC + 5
